Bird Grooming 101: Beak and Nail Trimming Safety
Bird Grooming 101: Beak and Nail Trimming Safety
If you have ever shared your home with a feathered companion, you know that birds are far more than just pets; they are intricate, highly intelligent, and emotionally sensitive family members. Unlike a dog or a cat, a bird’s physical health is often mirrored directly in the condition of its plumage, the sharpness of its beak, and the length of its talons. Maintaining these features isn’t just about aesthetics; it is a fundamental aspect of avian welfare. Welcome to Bird Grooming 101: Beak and Nail Trimming Safety, a comprehensive guide designed to help you navigate the delicate balance between keeping your bird groomed and keeping them safe.
In the wild, birds have a natural “gymnasium” of rough bark, stones, and varying textures that naturally wear down their beaks and claws. In a home environment, even with the best enrichment, these structures can become overgrown. When this happens, it isn’t just a minor inconvenience. Overgrown nails can get caught in cage bars or fabric, leading to broken toes or panic-induced injuries. An overgrown beak can make eating, preening, and climbing difficult, if not impossible. But how do you handle a creature that is essentially a bundle of hollow bones and high-speed reflexes? That is exactly what we are going to explore today.
Understanding the Basics of Bird Grooming 101: Beak and Nail Trimming Safety
Before we pick up a pair of clippers or a file, we must understand the anatomy of what we are working with. The beak and the nails of a bird are made of keratin—the same protein found in human hair and fingernails. However, unlike our nails, a bird’s beak and claws have a living core known as the “quick.” The quick contains blood vessels and nerve endings. If you cut into this area, it will bleed, and it will hurt. This is why Bird Grooming 101: Beak and Nail Trimming Safety begins with a deep respect for the physical limits of the bird’s body.
Let’s be honest: the idea of trimming your bird’s nails for the first time is terrifying. You might worry about losing their trust or, worse, causing them physical harm. This fear is actually a good thing; it means you respect the stakes. A bird’s beak is also a sensory organ. It isn’t just a “mouth”; it’s a hand, a tool, and a stabilizer. When we talk about Bird Grooming 101: Beak and Nail Trimming Safety, we are talking about maintaining the functionality of these tools without infringing on the bird’s sense of security.
Signs That Your Bird Needs a Trim
How do you know when it’s time? Usually, the bird will tell you, though not in words. For nails, watch how the bird stands on a flat surface. If the toes are being pushed upward or the bird’s foot cannot rest flat because the claw is too long, it’s time. You might also feel it yourself—when your parrot perches on your shoulder and it feels like needles are digging into your skin, that’s a clear sign. While some owners use specialized perches to help, they aren’t always enough to keep up with rapid keratin growth.
Beak overgrowth is slightly more subtle but significantly more dangerous. A healthy beak should be symmetrical, and the top mandible should close properly over the bottom. If you notice the tip of the beak curving excessively toward the chest, or if the bird seems to be struggling to crack seeds or pick up small objects, professional intervention or careful grooming is required. In the context of Bird Grooming 101: Beak and Nail Trimming Safety, the beak is much riskier to handle than the nails, and often, beak issues indicate underlying health problems like liver disease or nutritional deficiencies.
Essential Tools for Safe Bird Grooming
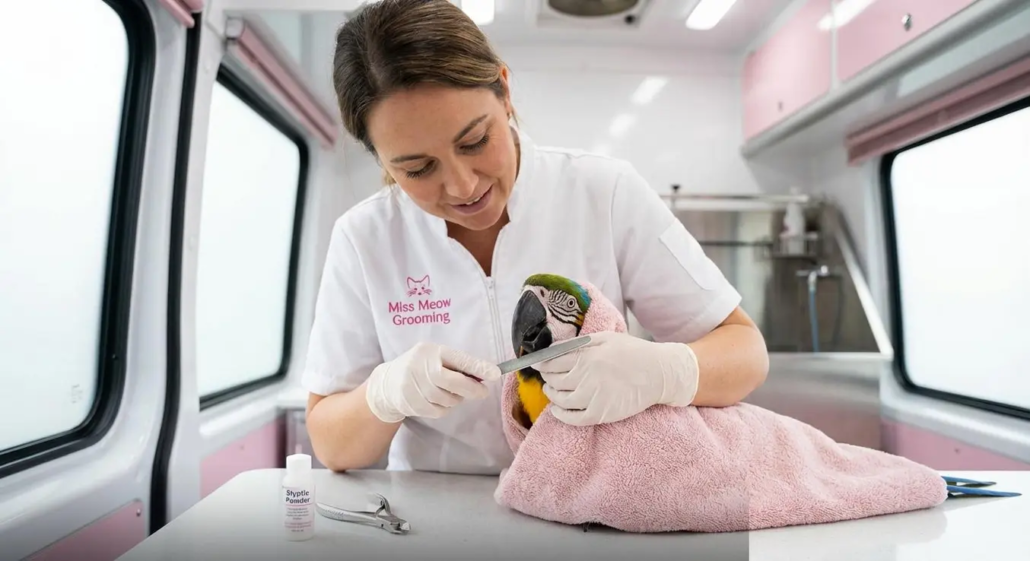
You wouldn’t use a chainsaw to prune a bonsai tree, and you shouldn’t use improper tools on your bird. For small birds like budgies or cockatiels, a simple pair of human fingernail clippers or a small cat nail clipper works well. For larger parrots like Macaws or African Greys, you may need heavy-duty pet clippers or even a rotary tool (like a Dremel) for filing. However, the most important tool in Bird Grooming 101: Beak and Nail Trimming Safety isn’t the clipper—it’s the styptic powder. Whether it’s a commercial brand or a pinch of cornstarch in a pinch, you must have a blood-clotting agent ready before you even touch the bird.
While many people focus on traditional pets, the industry for specialized care is expanding. Many owners who utilize a dog grooming van in Dubai often ask if the same convenience can be applied to their exotic birds. While birds require a much more controlled environment than a dog, the principle of bringing professional care to the pet is becoming a standard in the industry. Having the right tools on hand, whether you are in a specialized van or your living room, is the first step toward a successful grooming session.
Preparation: The Art of the Towel
In Bird Grooming 101: Beak and Nail Trimming Safety, the “towel method” is the gold standard for restraint. You aren’t just wrapping the bird to stop it from moving; you are providing a sense of security and protecting yourself from those powerful beaks. Use a soft, breathable towel. The goal is to gently secure the neck (without putting pressure on the chest, as birds have no diaphragm and can suffocate if squeezed) and tuck the wings close to the body. This prevents the bird from flapping, which is how most wing and leg injuries occur during grooming.
Transitions are important here. Once the bird is “toweled,” take a moment to let them breathe. Talk to them in a calm, soothing voice. If the bird is panting excessively or their eyes are pinning wildly, stop. No grooming session is worth a heart attack. If you feel overwhelmed, it might be worth looking into Miss Meow pricing and packages to see how professional groomers handle various species, as their experience can provide a blueprint for your own home care routine.
Bird Grooming 101: Beak and Nail Trimming Safety – Step-by-Step
Now, let’s get into the actual process. For the nails, identify the quick. In light-colored nails, the quick is a visible pink vein. In dark nails, you have to guess, which means taking off tiny slivers at a time. Hold the toe firmly but gently. Snip the very tip. If you see a small dark dot in the center of the cut surface, stop—that is the beginning of the quick. If you accidentally cut too far, don’t panic. Apply the styptic powder with firm pressure for a few seconds until the bleeding stops. Remember, your bird will pick up on your panic, so stay cool.
Beak trimming is a different beast entirely. In most cases, a healthy bird should not need its beak “trimmed,” but rather “filed.” Using a fine-grit emery board, you can gently smooth out any flaking layers or sharp points. If the beak is truly overgrown, this is often a sign of “Scissor Beak” or “Parrot Mouth,” conditions that require an avian vet. However, for maintenance, Bird Grooming 101: Beak and Nail Trimming Safety emphasizes that less is more. Never attempt to cut the beak with clippers, as the keratin can shatter, leading to excruciating pain and permanent deformity.
Creating a Stress-Free Environment
Why do some birds seem to hate grooming more than others? Often, it’s about the environment. If you only bring out the towel when it’s time for something scary, the towel becomes a trigger for fear. On the other hand, if you incorporate the towel into playtime or snuggle time, the “scary” factor vanishes. This is a key psychological component of Bird Grooming 101: Beak and Nail Trimming Safety. You want to desensitize your bird to being handled and having their feet touched long before the clippers come out.
Consider the lighting and noise levels. A quiet room with soft lighting can lower a bird’s metabolic rate, making them less reactive. If you have other pets, such as cats, make sure they are in a different room. Even if you regularly use cat grooming services to keep your feline friends tidy, their presence can be predatory and terrifying to a small bird during a vulnerable moment like grooming. Focus entirely on the bird in front of you.
The Role of Nutrition in Grooming
Did you know that what your bird eats directly affects how often you need to groom them? A diet high in seeds and low in vitamins can lead to poor keratin quality, causing beaks to grow too fast or nails to become brittle and flaky. Incorporating fresh greens, orange vegetables (like sweet potatoes for Vitamin A), and high-quality pellets can actually reduce the frequency of your grooming sessions. Missmeow Grooming often emphasizes that health starts from the inside out, regardless of whether you are caring for a poodle or a parrot.
By maintaining a proper diet, you are participating in a proactive form of Bird Grooming 101: Beak and Nail Trimming Safety. A healthy bird has a beak that naturally wears down through regular use and nails that are strong but not excessively fast-growing. If you notice a sudden change in the rate of growth, it’s a red flag to check their liver function with a veterinarian. Grooming isn’t just a chore; it’s a diagnostic tool that helps you stay in tune with your bird’s internal health.
Common Mistakes to Avoid
One of the biggest mistakes owners make is rushing. Speed leads to accidents. Another mistake is ignoring the “blood feathers.” While not directly related to beak and nail trimming, if you are doing a full groom including wings, clipping a blood feather can be a medical emergency. In terms of Bird Grooming 101: Beak and Nail Trimming Safety, always focus on one task at a time. Don’t try to do wings, nails, and a beak file all in one go if your bird is getting stressed.
Another pitfall is using dull tools. A dull clipper will crush the nail rather than cutting it, which is painful and can cause the nail to split up into the quick. Just as you would expect high-quality equipment when you book a pet grooming appointment for a dog, you must provide the same level of quality for your bird. Keep your tools clean and sharp, and sanitize them with alcohol between uses to prevent the spread of bacteria or fungi.
When to Seek Professional Help
Let’s be honest: some birds are just too difficult to handle at home. If you have a bird with a history of seizures, respiratory issues, or extreme aggression, DIY grooming might not be the safest path. There is no shame in admitting that a task is beyond your current skill level. Professional avian groomers or veterinarians have the experience to handle difficult cases quickly and safely, often with the help of an assistant to ensure the bird is held perfectly still.
While you might be used to looking for mobile pet grooming in Dubai for your four-legged friends, finding a specialized avian groomer is just as vital. They can provide a “pedicure” that includes smoothing the edges of the nails so they don’t snag on your clothes. This level of professional finishing is part of the “101” education—knowing your limits is the ultimate sign of a responsible bird owner. Bird Grooming 101: Beak and Nail Trimming Safety is about the bird’s life, not your pride.
The After-Grooming Care: Rebuilding Trust
Once the trimming is done, the most important part begins: the peace offering. Your bird might be a bit grumpy or even “snub” you for a few hours. This is normal. Offer their favorite treat—perhaps a bit of spray millet or a piece of walnut—and return them to their cage to rest. This reinforces that while the grooming was unpleasant, it is over, and it resulted in a reward. Over time, the bird may even become more cooperative, realizing that the process is quick and always ends in a treat.
Monitoring after the session is also crucial. Keep an eye on their perching. Do they seem comfortable? Is there any sign of a lingering bleed? By following the principles of Bird Grooming 101: Beak and Nail Trimming Safety, you ensure that the experience is a minor blip in their day rather than a traumatic event. Consistency is key. If you keep up with small, regular maintenance, you will rarely have to deal with the stress of a major, “overdue” grooming session.
Conclusion: Empowerment Through Knowledge
Mastering Bird Grooming 101: Beak and Nail Trimming Safety doesn’t happen overnight. It takes patience, a steady hand, and a deep bond with your bird. By understanding the anatomy of the quick, preparing the right tools, and prioritizing the bird’s emotional state, you turn a potentially scary chore into a routine part of your caregiving. Whether you are doing it yourself or seeking professional help, the goal remains the same: a happy, healthy, and comfortable bird.
Remember, grooming is an act of love. It’s about ensuring your parrot can climb their favorite ladder without tripping, or eat their favorite fruit without struggle. As you become more confident in your skills, you will find that your bird senses your calm, making the whole process easier for everyone involved. Keep learning, keep practicing, and always put safety first. Your feathered friend will thank you for it with every whistle, chirp, and nuzzle.

